Baby Shower Tie Dye

Historically I have never loved baby showers. It should surprise exactly no one that the construct of most baby showers gives me (or gave my 22 year old self, anyway) the extreme heebie jeebies. All the cooing, all the fawning, all of the mandatory performative group gift opening resulting in a hat made of curlicued ribbons for a probably-already-somewhat-beleaguered-sober-woman-with-swollen-ankles-pounding-cake-at-10am. Also, where are the dudes? You call this a party?

Hearing my best group of (single, non-mother) girlfriends talk smack about an upcoming baby shower this spring in front of our 5 months pregnant friend (“God. They’re the worst. All the moms standing around looking tired just waiting for their gift to be opened and then saying (does awful high pitched voice) ‘I know it doesn’t look like much BUT HE’LL LOVE IT WHEN HE’S OLDER I PROMISE!’… “Oh yeah, oh yeah or like ‘THIS WAS A TOTAL LIFE-SAVER FOR US’… Seriously? BARF!”) makes me also think my 22 year old self was probably kind of a jerk. Sorry, Stacey + Ev!

That being said, there are aspects of the modern baby shower that definitely suck. And there are aspects of it that are totally and completely luminous, heart-lifting, and truly amazing. Under the latter file: bringing together a group of strong, fierce women at the height of their wolf-running-wisdom wherever they are on their trajectory towards (or away from) motherhood. Creating a kinship network of oral history and babe-rearing tradition based in experience and trust the likes of which would have existed if we all still lived in a village or on a commune but is now difficult to authentically muster from the smoking ashes of interdependent female communities in the age of distance and distraction. Experiencing the generosity of spirit and in-kind support at a time when you literally need a whole crap ton of stuff (did I need a gravy boat when I got married? nope. but when babe came along I sure as hell needed a car seat and thems expensive). Being given the opportunity to feel like the wondrous-yet-mundane thing you are doing—the thing that is at once as giant as the cosmos and as small as a pinprick of blood—is not a solitary, isolating pursuit relegated to bloated midnight lonelinesses and WebMD fear-cycles, but is actually an interconnected miracle in a long line of lady-power-history? That is incredibly potent. And, you know, love.

Chief among the legendary bummers at baby showers: no booze. GAMES.

I completely understand the desire for some sort of “activity” at a shower… after all, at a regular party there’s music and dudes and dinner and bonfires and shenaniganz and oysters and unpasteurized cheeses and someone might end up dancing on the picnic table so hard it breaks. At a baby shower? If you’re lucky, there’s ribbon hats and a diaper cake. Womp Womp*. If you’re unlucky, well, you might find yourself in a self-made hell of eating fake poop made of candy bars out of a Huggie. You can’t make this Baby Ruth up.

*(though, TBH, at Rav’s baby shower we did go through a case and a half of champagne and someone did end up asleep on the glider on the porch around midnight with a piece of fried chicken in her hand. IT CAN BE DONE).

Like everything in life (and in parenting, as ye being showered may soon discover) there can be a lovely middle ground for every dilemma.

Enter: TIE DYEING ONESIES.

As an “activity” it’s essentially perfect. It’s easy, it’s fun, it’s safe and non-toxic for babe (unlike paint or similar), there’s no fake poop (why is this even on a list), no one has to do it, it gives perhaps disparate strangers from different eras or circles in the mama-to-be’s life something to talk about other than their pregnant woman in common, someone is usually secretly (and perhaps surprisingly) excellent at it, and when it’s all said and done, the mama leaves with a ton of killer clothes for the little bohemian that, in addition to looking fresh to death, also do a great job at hiding stains. WINNING ALL AROUND.

Long story long (and the putative reason for this post) I’ve been point person for a few tie-dye-onesie extravaganzas at various showers (including my own) and subsequently, I’ve been asked for a breakdown of instructions and supplies multiple times since. After my dear one Reid wrote me this week asking for a rundown for a shower she’s throwing, I decided to just write it all down in one place. Perhaps the internet will find it and it may help like-minded souls avoid the slings and arrows of outrageous diaper games and nudge our collective inner-20-something’s feelings about showers from “BARF” to “actually, that was really so very lovely”.

Who knows, if there’s champagne we might make it all the way to “man, what a fun party!”

BABY SHOWER ONESIE TIE-DYEING

SUPPLIES 

  • White onesies– Gerber or Carters makes great standard onesies but WalMart also has a new in-house line of plain ones which are way cheaper/just fine if money is a concern (which it often is if you’re throwing the shower with a bunch of women in a group/sometimes all the time). If you’re fancy then you can buy organic ones from the local/sustainable purveyor of your choosing. If you’re really thrifty you can sometimes score plain ‘ol stained ones from thrift stores and that’s fine for this purpose. You do you. For people who don’t spend hours googling baby clothes, they call them bodysuits sometimes which can make it easier to search for them online. You’re welcome. You can explain Tinder to me some time.

Get an array of sizes/sleeve length. Ravenel somehow worked out exactly how many short sleeved vs. long sleeved onesies in appropriate size ranges for babe age at the given season (e.g. my Lois Rose was born in February so we had long sleeved newborn onesies, then a few long sleeved 3-6 monthers and a lot of short sleevers for that spring>summer, then a few short sleeve 6-9 monthers and a lot of long sleevers for summer>fall)… we had enough/still do for the babe to be outfitted in tie dye basically until she’s done with onesies/is in high school.

From divine mama Meags, here’s the exact breakdown of what they got for a winter babe:

3 Pack Long-Sleeve (0-3 Months)
5 Pack Long + Short Sleeve Variety Pack (3-6 Months)
5 Pack Long + Short Sleeve Variety Pack (6-9 Months)
3 Pack Long-Sleeve (12 Months)
3 Pack Short Sleeve (18 Months)

  • Dye- I love Procion dyes which are brighter/more colorfast, but do require a bath in soda ash fixative prior to dyeing. Rav bought AMAZING COLORS (turquoise, cobalt, green, and hot pink) for me, but this kit has primary colors which can be mixed. I ended up loving the prettier colors so it was definitely “worth it” to buy the colors individually.
  • Soda Ash Fixative: The “soda-ash” in the aforementioned kit is sold in a tiny cellophane bag like it’s diamond dust. It is NOT PRECIOUS. This Arm & Hammer Washing Soda (which is sold at most grocery stores in with the laundry stuff) is the same thing for like one dollar.
  • Large bucket or pot for the ash pre-soak.
  • Gloves- I bought a pack of these nitrile gloves for this purpose and have since become addicted to having them on hand for dealing with bones or skulls when I find them (or, you know, whatever you use fine touch plastic gloves for).
  • Squeeze Bottles You can dip the onesies into pans of the dye (and I use disposable tinfoil roasting pans for this purpose) but it’s also cool to be able to direct the stream of the dye to have more control over what goes where. Especially useful if there are any people in attendance who are secretly super good at this kind of thing you’ll get, like, five from that person with hearts and stuff shibori’d into it.
  • Rubber Bands- For tying up the knots/making the patterns
  • Individual plastic bags- Having a big stack of plastic grocery bags is super useful for separating individual onesies out when they are done being dyed so they don’t drip dye all over each other in a big pile and ruin everything. The onesies are also supposed to “set” overnight, so it’s nice to just have a paper bag full of the plastic bags corralled and not making a mess anywhere.
  • Aprons, plastic tablecloth, newspaper, etc– nice to cover the area/floor if doing it inside. Do it outside if you can.
  • Bring other stuff to tie dye if you want! Swaddles, crib sheets, or boppy cover for the mama, or old t-shirts/stained throw pillow cases/whatever you have lying around that’s old and tired while you have the dye stations set up it’s NBD to slap a new coat of many colors onto a tired old thing. Keep all of the things separate.

INSTRUCTIONS

Obligatory duh warning: dye will dye clothing and stain things. Use a plastic tablecloth with newspaper over it and gloves, but people should be mindful of their clothing. The squeeze bottles will also sometimes burp little toots of color.

  • Fill canning pot or large bucket with hot water and stir in 2 cups of washing soda/dye fixative.
  • Soak onesies in hot water with fixative for at least 15 minutes before dyeing. Washing the onesies first makes them more receptive to the dye but, honestly, not enough that it’s a deal breaker if you don’t get around to it. It’s a party! Relaaaax.
  • The ash water is not caustic or harmful, but some people find that it dries their skin out, FYI.
  • Mix dye powders in squeeze bottles to desired colors using hot water. Use at least a teaspoon of dye per bottle. More dye=more saturated color. Enjoy deep discussions re: primary vs. secondary colors/favored colors/gender normative color assumption.
  • Squeeze ash water out of onesie, tie/twist/fold and rubber band into your desired design, squeeze or dip dye onto onesie in desired location.
  • Place each finished onesie in its own plastic bag and corrall them all in another bag so whoever is in charge of processing them (the mama, someone else) can grab them and bounce when the party’s over.
  • Once the onesies are dyed they can just chill in their plastic bags until processed. At least overnight and not so long that they get moldy.
  • To process: Officially, the best practice is to rinse the onesies in cold water with their rubber bands still on and then rinse them under warm water while removing the ties before machine washing… but parties have happened where one or both of those steps have gotten skipped with fine results. How intense you want to be with it is up to you.
  • Wash onesies with detergent in the washing machine with hot water and a cold rinse. Et voilà
  • It’s nice to clean up soon afterwards so the dye doesn’t stain the squeeze bottles/any other thing. FYI, procion dye is fine to pour down drains in newly glazed porcelain/enamel sinks or metal sinks but may stain old porcelain sinks/tubs.

ENJOY ENJOY ENJOY BEST OF LUCK WITH YER BABES + YER PARTIES!

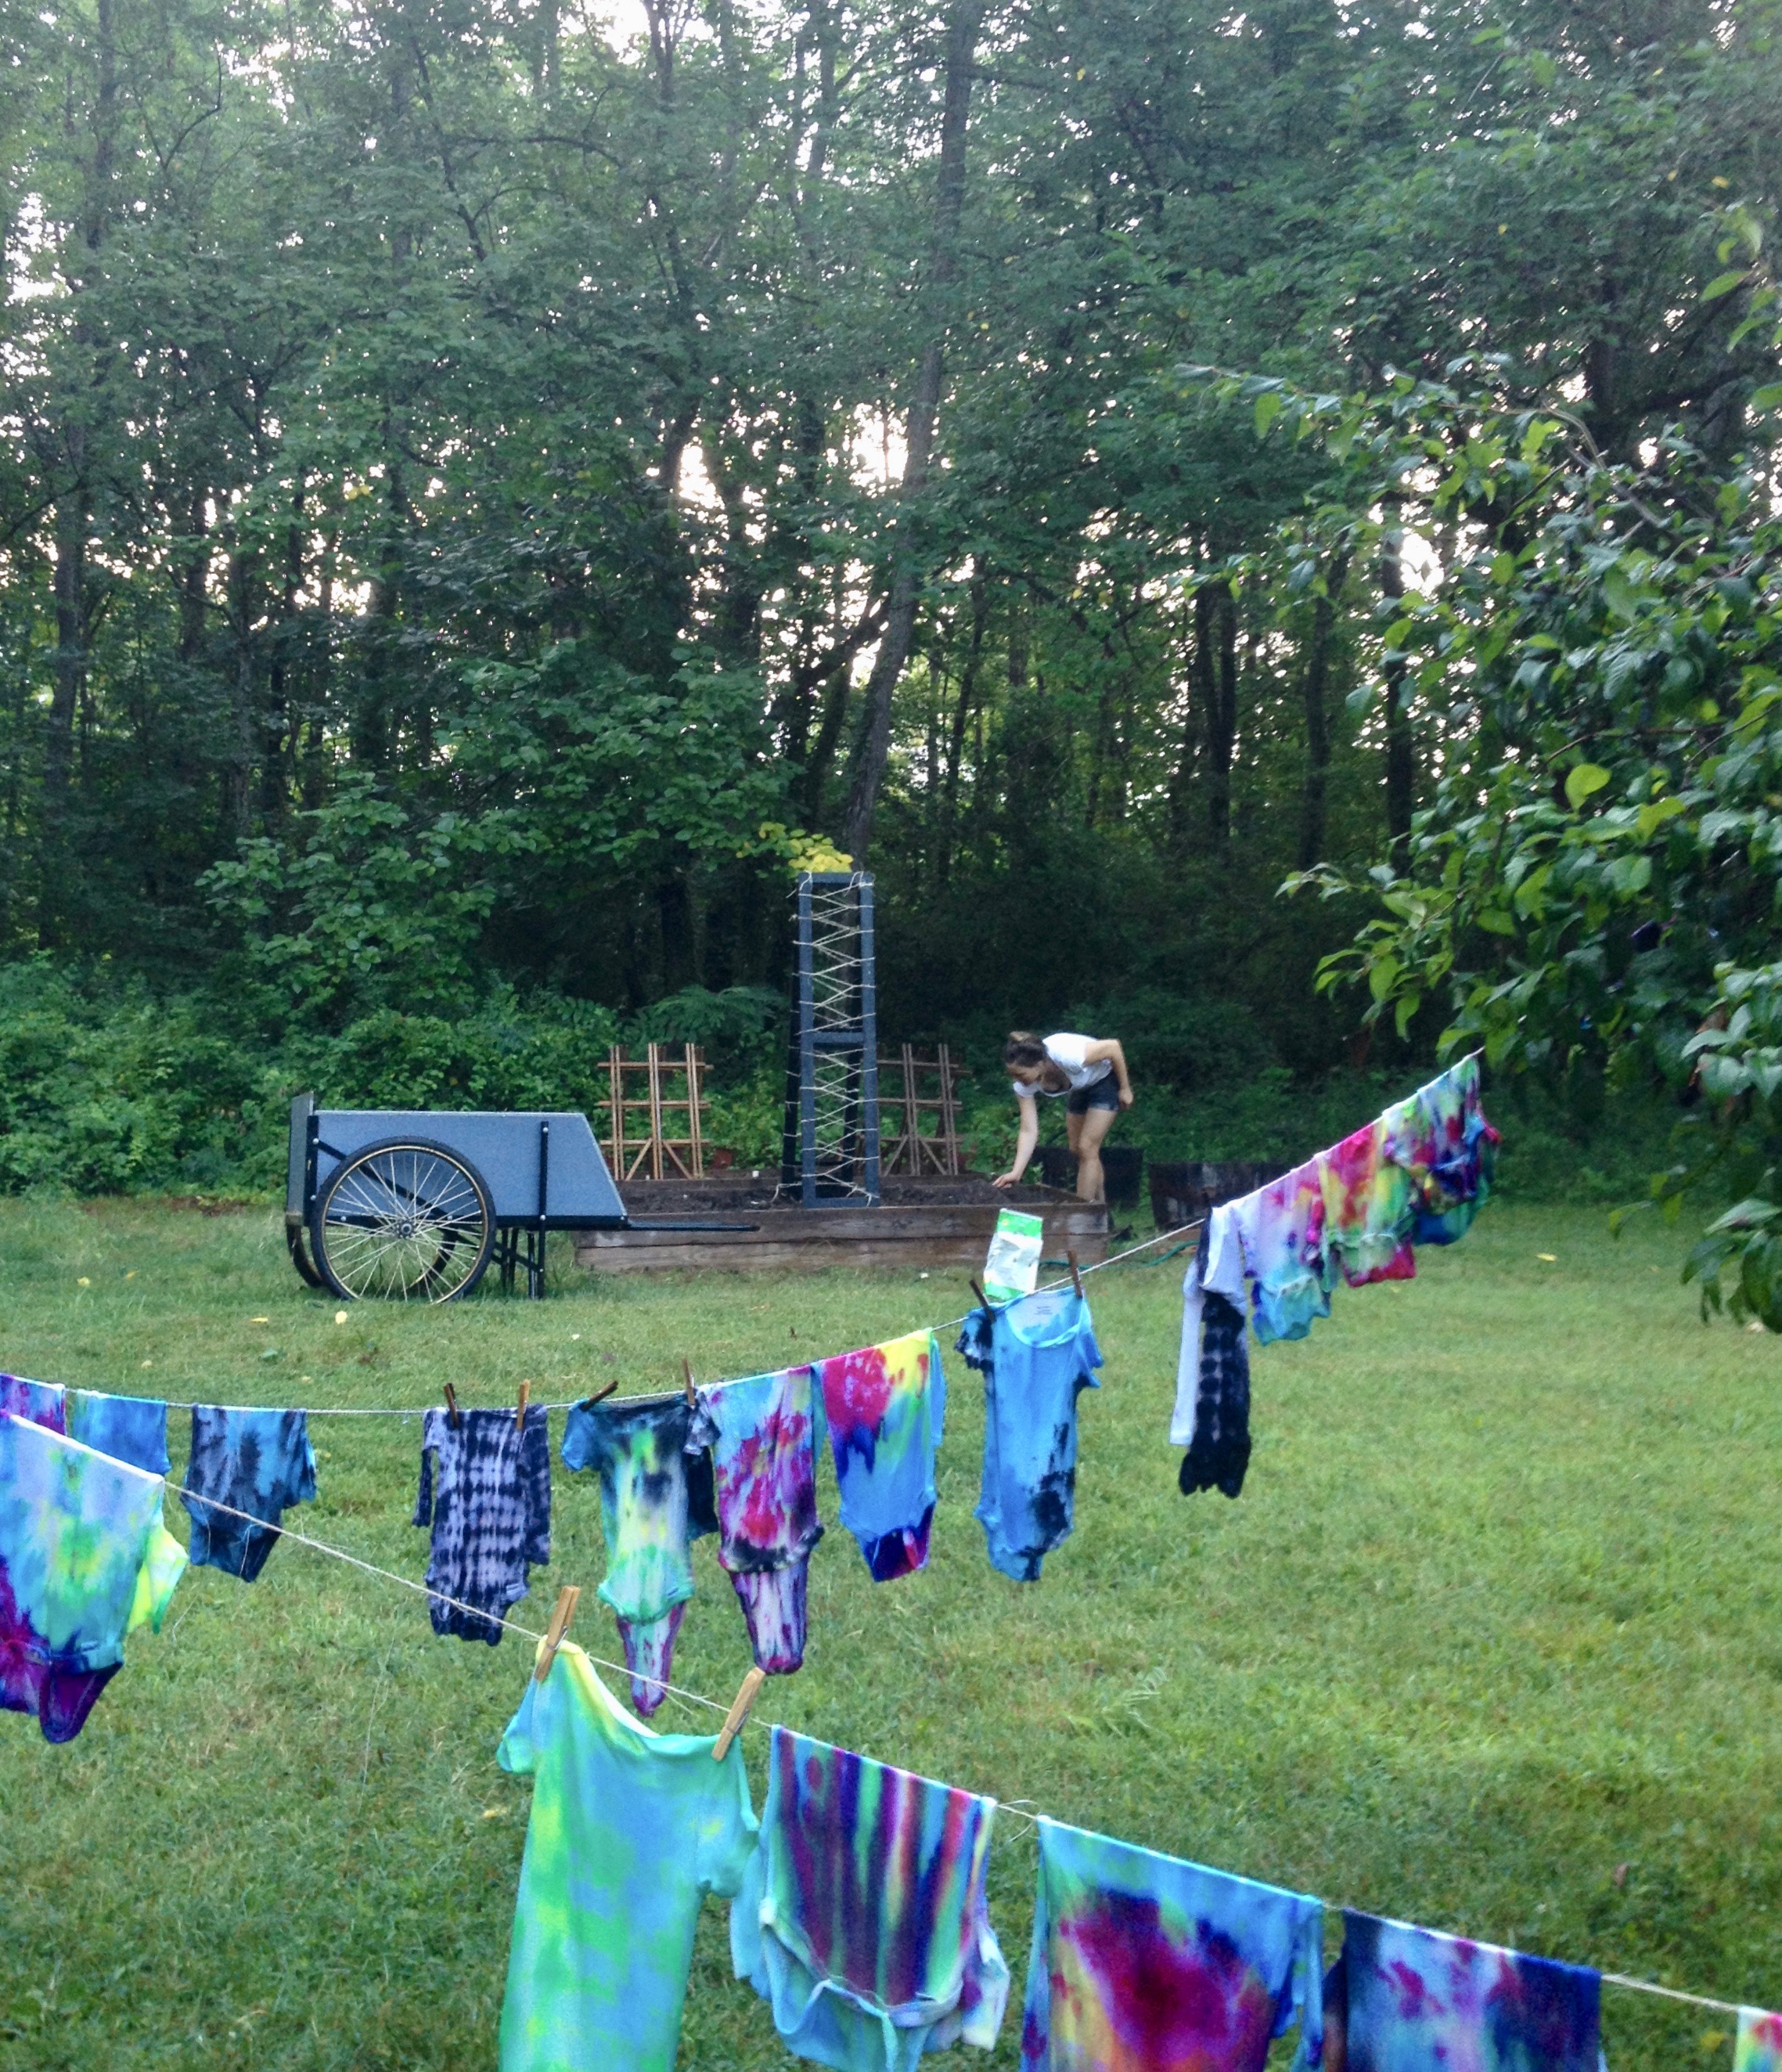
ps. Here’s Lois this week in her tie dye in the same raised bed with the same gardener (Ann Marie, tending bounty with grace, always) as in the first shot. Time flies when you’re making things grow. as an afterthought because the world be crazy especially ab babies:

I am a plebeian layperson. While the information herein is carefully researched and checked for accuracy, the author makes no warranty regarding the content of this website and will not be liable for any loss, damage, or injury arising from the use of any information on the site.

I am not a medical professional and the advice on this site and newsletter should not be taken as such. It is not the business of the author to render professional opinions or medical advice. Readers should always seek professional medical advice from their pediatrician, OB/GYN, or midwife, blah blah blah.

Thanks to lucieslist for the language.

Advertisement

Nesty Gift Tags

tofromtagIf you hadn’t noticed, my holiday plans are seriously nesty, and this year, I’m planning on gifting along those lines. If I’m trying to live simply with a focus on use and beauty, purging my scene of things that are not purposeful or graceful, then I should pay that forward, right? And, no, it’s not just because I’m currently 396 miles away from the Union Square Holiday Market mayhem. This year, that goes for the wrapping too. So, I have my stack of plain brown paper bags and farm twine ready to go, aaaaand, as if on cue: the genius ladies at DesignSponge* are offering these free printable gift tags. How Lovely.madebytag_whiskmadebytag_yarn

Stump Speech

When I first stumbled across Best Made, a New York based company whose absolutely gorgeous hand-hewn and painted axes retail for up to $300, I had a smarmysmirk. I can certainly get behind the idea that objects of use should be objects of beauty, that form, function, build and tame are among the most ancient human impulses as we have. But, I thought, come on. A (stunning) $300 axe for uppity, bearded, maketank New Yorkers to hang on the wall of their lofts for show? Because-seriously-who-in-New-York-has-a-tree-and-if-you-were-lucky-enough-to-have-a-tree-why-on-earth-would-you-chop-it-down. Birch Please.

Then. I found the stump in my backyard. This old stump had at one point been burnt, covered in bricks and debris, forgotten until Sweetheart and I unearthed it in a torrent of centipedes and (my) shrieking. On Monday, it was the size of the red oval:
I broke it up myself using a rusty old axe I found in the backyard that must have belonged to the original landlords from the 1850’s. This is what my axe looks like:
Oof. My axe is like off-brand jeans. It works OK, but it could be a little shiner and a LOT sharper. New York is funny in this way, it can give you little nuggets of self-revelation that come with sweat and honest toil, and in the same fell swing can make you covetous of a $300 axe named “Flashman”. And the crazy thing? I think I might have earned it.

Home Sweeter Home: Parts 3 and 4, Before

After Mama and I tackled DAS NORDEN and made my kitchen ship-shape, and after we un-antiqued the gnarly old secretary to turn it into a sweet desk fit for inspirational working, I turned my eye upon the bedroom Sauron-like. Wow. Looks sad. Not at all the kind of calm, adult space that feels like a respite from the madding crowd. Instead, it’s guilty of that kind of spatial inertia that grips a space after you move into an apartment and then… it just never changes. This was all compounded by the fact that I lived here for a year solo before Sweetheart moved in, so not only is the bedroom sort of tired, it’s also been sort of cobbled together out of necessity. The mandate: create a space that belongs to Sweetheart and I equally that is uncluttered, calming, functional, unified, and interesting. A good place to sleep, but also a lovely place to be. A place that is as bright as possible during the daytime while also being private at night… on the extreme cheap. That’s a tall order. The Bedroom, like the rest of the apartment, has a bizarre list of issues and perks all sort of stemming from the layout (I used this cool tool to make this little mockup on Apartment therapy): The major layout issues are: the decorative fireplace, the placement of the windows and the doors, and the existence of the radiator at all. This room was originally the main kitchen for the rest of the brownstone, so this fireplace is essentially one of those epic kitchen hearths large enough to hold an entire spitted pig. There are marks where the spit used to be. If only we could still use it to roast a whole hog. That sounds like a romantic bedroom activity. Unfortunately, the fireplace is now simply “decorative”, so when I first moved in the obvious function of this weird obsolete fire-hole was as a Carrie-Bradshaw-style shoe shrine, which was great. Over the past few years, though, I’ve acquired a) many, many more shoes and b) Sweetheart (and all of his shoes), so it’s gone from glorious to sort of gross.

It also means that the layout of this wall is sort of fixed/the only logical place for dressers/clothing storage are via two tall dressers on either side. And that means that the bed has nowhere to go but between the windows.This picture, as funky as it is, isn’t even the “before” at its worst as I already took down a set of too-long embroidered turquoise curtains (and have just installed custom cut blackout/privacy shades into the windows- notice the drill on the bed, not usually where I keep it) and swapped out the awful Ikea dresser Sweetheart got stuck with when he moved in for a dark wood piece with nice bones FREE from craigslist (pictured already above with Edison Radio). You can also see that the windows a) aren’t the same width b) one is flush with the ceiling and the other is 3″ below the ceiling c) they don’t match- one has old mullions and the other is “new”.

So. What can we do with this space? The windows are crazy, there are shoes everywhere, we can’t paint it, the bed backs up on the windows, it’s dark as a dungeon, and there’s only one plug. Even the pillows look unhappy to be there. What’s a girl to do? We’ll get to that tomorrow… but in the meantime, here’s a hint:

Home Sweeter Home: Part 2

How much do I love you guys? Enough to post the above photo of myself working at my secretary desk as a “before” shot. While the picture isn’t the most flattering of yours truly and I look to be wearing a tunic made of diapers, it is an accurate depiction of the old brown secretary that was/is my desk. This piece used to belong to Buddy and Grammy, my grandparents on my Mama’s side, and in an amazing feat of early 1970’s DIY (perhaps the very first DIY?) they “antiqued” this piece, covering up its nice lines and mid-century-reproduction-quality mahogany with a brown gunk that was meant to look old. It did, in fact make the piece look old. And tired. You can also see that the brownness wasn’t helping the darkness situation in my little “office” corner of the apartment. It was making it darker. Like “locusts covering the sun” darker. This picture was taken around noon, and you can see that four feet in from the window it’s almost pitch black. I might not have feet. After we tackled DAS NORDEN (which you can now see in the background here in all its Gabardine Glory), we now moved this piece into the kitchen for part II of painting mayhem. I love the little details of the inset piece- three curvy drawers, a tiny brown door (my Mama told me she used to say that a mouse lived in there when this was in her house growing up), and you can see where the “antiquing” ends on the inside of the drawer pieces. Yech.

As you may have read here, we had initially planned on painting this piece Martha Stewart Gabardine, and wanted the interior of the piece (the glass curio cabinet and the desk part) to be creamy white. Perhaps that would have worked in an airy loft wallpapered in Cochin from Grow House Grow:BUT, as we’ve established, that is not what I’m working with. SO- we decided that to brighten up the area and to be pleasing to the eye, that our palette would be Martha Stewart Oolong with Pale Yellow (generic paint purchased from the wonderful guys at Clinton Hill True Value). First we took the drawers out, the doors off, the shelves out, saved the burnished brass hardware, and primed the whole shebang:

Then, of course, we let it dry overnight and drank some wine. Are you seeing a pattern? When it was all said and done, it was pretty much perfect:So much brighter, so much lighter, and so much more functional. This is my desk when it’s open, useful storage when it’s closed, and it’s also (by necessity) home to our DVD player/Netflix Machine. I sit at this desk for many hours every day, so, needless to say it’s lovely to love looking at it (I’m looking at it as I type this). The mouse house now houses my mouse and mousepad when I’m not using them:The little curvy drawers that were once yechy are now sweet, lovely, and useful (I lined them with some pages of an old New York City postal-code book I found):And- my favorite part- the curio cabinet up top holds all of my little treasures and miniature inspirations (like my Baracklyn Cyclones Obama bobblehead, an armadillo skeleton found on Cumberland Island, a collection of sand dollars gathered from the Vashon Island mud flats at low tide, a tiny compass from the Marché aux Puces, and the weird little frog watering can that I picked out from my Great-Grandmother’s house when I was 10, to name a few):Pretty darn good.

Home Sweeter Home: Part I

After seeing Jenny’s Mom’s sideboard looking so fresh and so clean (almost as an aside in this post about the lovely green wallpaper), I decided to tackle our identical Ikea NORDEN for my first project. I capitalize NORDEN because anytime I say any Ikea name I say it loud and in a bad/deep Swedish accent. Here is the naked NORDEN:First, let me tell you a few things about our apartment. It is the whole bottom (read: basement) floor of a classic Brooklyn Brownstone. The kitchen is HUGE by New York standards (110 sqare feet) and our landlords re-did it a few years ago, choosing the marble-and-cherry wood finish and stainless steel appliances that were so very popular at that time. All the nitty gritty kitchen functiony things about it are pretty great (storage, counter space, big sink, dishwasher [!!!!!], large gas range with griddle etc.) and we cook in it ALL the time. But… it will never look like this:It will never look like this for a few reasons: a)  I am not Julia Child (sigh) b) our kitchen has no windows, it is, in fact, in the very middle of our apartment which is in the very bottomest darkest basement and c) there are no plugs in the kitchen into which to plug such a thing as a standing mixer and/or a lamp so- no-knead bread and overhead lighting it is. But I digress. Since I couldn’t just up and move to France, it was time to paint my NORDEN. For that I needed my Mama. We had ingeniously scheduled for her to come and visit at the exact time when the need to revamp was reaching a critical fever. With her help and guidance, we had two major projects lined up, first take care of das Norden and second, to paint the old secretary that I use for my desk (spoiler: you will be seeing some pictures of this very soon). We went together to pick out paint and decided on these two colors. Martha Stewart Oolong Tea- a sandy celadon we hoped would read less yellow- for the NORDEN, and Gabardine- a blue-green-grey color equal parts “stormy sea” and “I think the man in this suit is a spy”- for the secretary. Even after many inspiration based e-mails on the subject and lots of in-person discussion spent contrasting the colors of my pots and pans, we still probably talked about it for, like, an hour at the Home Depot on Nostrand Avenue next to the Sugar Hill club. We got our paints mixed, bought a few tools and a fair amount of wine and got to work sanding and priming. We had help the whole time:After our first round of sanding and priming, we had to leave the NORDEN in the middle of the kitchen overnight, so we ordered takeout and started in on the wine. About a bottle into it we looked at each other and said: We’ve got the colors backwards! NORDEN must be GABARDINE not OOLONG! In vino veritas. The next morning we started in on the gabardine, and spent most of the day on the floor. We had a very good time down there:When all was said and done, we loved it. We kept looking at it and saying “It looks more blue than green!”, then “it looks more green than blue”:Do I wish my kitchen were different? Yes. Do I wish it was brighter, airier, and not lit by four recessed floods? Yes. But, honestly, I can’t realistically change those things, so instead of maintaining some sort of bitter renters inertia, the simple act of just painting the NORDEN made our kitchen feel absolutely marvelous. Now the cast iron wok and the red dutch oven are friends, the fruits and strange amaros are close at hand, and we feel a bit more human.

More ever-loving thanks to Mama, who- as we’ve already established– never does anything half assed.

Julia Child’s marvelous kitchen from here.

Home Sweeter Home

So, I’ve lived in New York for a while now and, like pretty much everyone I know, I have serious apartment envy. Perhaps envy is the wrong word. Curiosity? Voyeurism? Obsession? I love nothing more than walking down the nicest streets in our neighborhood at night looking into people’s brownstones who left the shades open (look at that molding! what an amazing chandelier! They have PLANTS.). The same is true for online voyeurism- I (again, like pretty much everyone I know) practically refresh Design Sponge on the hour to see if there are new sneak peeks into the apartments of real people, I loved Domino, Martha Stewart is practically pornographic, and my pinterest is pretty much all pictures of people’s reclaimed wood tables, plush velvet couches, whiskey-organization-systems, and (again) plants that the light in our basement apartment cannot support. There are two things that are tough for me, though: unlike most the people who inhabit the amazing gorgeous spaces I suckle, 1) we rent our apartment, and so we can’t paint the floors or mess with the light fixtures or rip out the pre-fab dark cherry kitchen cabinets and  2) at this point (le sigh) Dorothy Draper dressers and/or any sofa that isn’t our trusty futon aren’t in the financial cards for us. The Selby will never be in our place. I think this is why I love Little Green Notebook so much.Unlike so many of the other designey blogs out there, which engender only covetousness, Jenny fosters a grand and wonderful sense of possibility (also, is it weird that I totally feel like we’re on a first name basis?). She has me believing I really could reupholster the victorian settee that belonged to my great-grandmother myself, that careful editing and judicious use of craigslist can make a space look (pretty much) just as good as a space furnished out of Holler and Squall or John Derian, and- most importantly to me- that just because you don’t own your space is no reason not to make it your own. She also always has a bright red manicure when she’s doing semi-manual labor and that’s something I can get down with.After the one two punch of watching Jenny take down temporary wallpaper (!) in her rental apartment and realizing that the kitchen island that Jenny and her mom re-painted here was the EXACT same one that we have from Ikea (but with additional hardware) I thought: I can do this. For the past two months or so I’ve been on a Little-Green-Notebook-fueled, totally low-budget vortex-redux of our apartment. With infinite thanks to Sweetheart, my ever-lovin-Mama, and, of course, Jenny: this week I’d like to share all the changes with you… Stay tuned.

Images from top: here, here, and here.

Nesting Itinerary

WordPress still won’t allow me images (gnashing of teeth! shaking of fist!), so here’s a little narrative:

Expecting a slew of guests for the holidays, sweetheart and I are working on making our Brooklyn brownstone as streamlined and lovely as possible. After my recent jaunt abroad, it’s hitting me that we don’t have very much time! Here’s what we did yesterday to try and make our bedroom nest a little nicer (full disclosure I’ve been obsessing over the amazing Jenny at Little Green Notebook, and this bedroom redux will have her fingerprints all over it… I heart a woman who hearts her staplegun):

-Took the old curtains down, took measurements
-Notice that though windows look the same size, one is two inches smaller than the other.
-Also notice that one is flush with the ceiling and the other is two inches lower. nice.
-Went to home depot, flirted my way into getting wood cut for headboard also realized that pre-made curtain rods for the shoe fireplace (yes, I have a fireplace- non-working- dedicated as a shrine to shoes) are either too short or too long blargh!
-Got some wooden dowels in an attempt to circumvent.
-Drove to East Village and picked up a free dresser for Sweetheart from Craigs List. Had him meet me so I wouldn’t be abducted. Told my Dad that, he was happy.
-Dresser has some pretty serious dings on it, but has good bones and actually nice hardware.
-Many drawers inexplicably full of glitter. NOTE: Glitter is the Herpes of the craft world.
-Drive home across the Manhattan Bridge with the dresser vibrating and rattling.
-Find an amazing parking spot right outside the apartment. Score!
-Neglect to take before pictures in zeal to get things moving!
-Remove drawers from his old dresser, remove old dresser carcass to kitchen.
-Remove my dresser drawers, and wipe the whole thing down (yuck).
-Move my dresser to the other side of the fireplace to prepare for moving the bed to the other side of the room (which I’ve measured will fit).
-Move a big old naugahyde chair and side table into the corner for “holding tank”.
-Move bed across the room.
-Become Aghast at dust bunnies under bed.
-Realize bed on other side of the room “fits”, but won’t allow dresser drawers to open OR bedside table on either side. Also makes the path from the door to the bathroom feel like one of those humane slaughterhouse animal chutes, no bueno.
-Abandon that idea.
-Pour Wine.
-Vacuum thoroughly.
-Move bed back across room.
-Move my dresser back to its old spot.
-Wipe new dresser down/try valiantly to remove glitter
-Apply about 1/4 bottle of dark Old English on it- it looks damn good. May your first dresser be a masculine dresser.
-Put new dresser in dresser hole.
-Banish old dresser to curb. Still there today. A brief pang of “Brave Little Toaster” really, no one loves that dresser.
-Put Naugahyde Chair and side table back on opposite wall.
-Sweetheart begins to make dinner.
-I get out trusty drill and install custom cut rolldown blinds. Like a Champ.
-That’s done.
-I then try to screw into the fireplace. NOT HAPPENING. It’s made of kryptonite. I break my littlest drill bit. Now, really not happening.
-So- I realize I can screw into the mortar at either side, so I do this survival-desert island deal where I screw screws into the mortar, put a brad-type-nail perpendicularly into the wooden dowel/curtain rod and tie a string around the screw and around the nail. This, amazingly, works. Not a long-term solution, but it’s my version of a coconut radio.

The good news: A few steps closer to a streamlined bedroom that will be as “airy and spacious” as a brownstone basement allows.

The great news: The guests that are coming (Mama and Daddy among others) will bring a SEWING MACHINE and have already promised to fashion exquisite pillows, curtains, and valences. BAM.

If and when I ever get the power of pictures back I’ll post some pictures of the whole shebang!

Arts and Farts and Crafts

In which: my mama comes to town and we begin to execute a series of much discussed craft projects (increasingly-ambitious-proportional-to-the-amount-of-wine-we’ve-had)  painstakingly designed and overseen by Nipsey Russell the cat. More to come…

Old Fashioned Natural Dye Easter Eggs

My Dear Charlotte's Eggs

Oh My. I’ve written about dyeing easter eggs with natural dyes and plant reliefs before (onion skins make a sepia brown egg, lily stamens make bright yellow, beets make purple) and today, Easter Sunday, I received pictures from three friends (!) who made beautiful eggs using this old post. They are so lovely and classic in a way that feels simple and right– like seersucker and fresh cut grass or scratchy old vinyl music and twilight– that I thought I should re-post the instructions to pay it forward:

My mother collects bird-nests. By now she has dozens of them, and each one has a story… ‘this one with the auburn gold hair woven in is from Sally’s Valley, the hair came from Cayman, their Golden Retriever… this tiny one is from the barn at the farmhouse in Toano where you were born… this one with the beads of amber is from two Christmas trees ago, remember when we found it there in the branches?’ Her favorite nest, a delicate little number thatched with horse-hair and poets laurel, sat on a bow-front chest in her bathroom, and held three sepia-colored eggs blown hollow and covered with gossamer photo-negative outlines of tiny ferns, clovers, and gingko leaves.

Spurred into memory by the recent changes in the weather towards the warm and supple breezes of spring (and the sudden appearance of the hollow-chocolate-rabbit Easter tableaux manifesting themselves across New York), I decided to make myself some of these beautiful eggs. Instead of traditional dye, the sepia eggs of my youth are made by boiling the egg alongside yellow onion skins (easily acquired for free, especially in the north-eastern-winter-time-farmers-market glut of root vegetables).

You will need: eggs, onion skins, a small stockpile of interesting leaves (parsley is easy to get in a city as well as the aforementioned), panty-hose or cheesecloth or gauze (I found a bunch of those footies you try on shoes with), rubber bands, some sort of ballast (I used loose change).

-Fill a deep pot with water and bring the onion skins to a boil.

-Hollow out the eggs by piercing a small hole with a pin in either end of the egg, and, positioning the egg over an empty bowl, blow, baby, blow (you can leave the eggs intact, but then the finished product is perishable, and you won’t have the makings of a delicious frittata when it’s all said and done).

-Nestle your egg into the panty-hose (or square of gauze/cheesecloth) and put in a couple of leaves flush with the shell. The leaves resting against the shell creates the relief outline, so use your imagination.

-Tie the egg tightly off with a rubber band, add enough ballast to keep the hollow egg under the water, loop the rubber band around again and drop into the pot.

-Let percolate for as long as you want, until the egg achieves your desired level of greatness.

-Remove the egg from the water with a slotted spoon and place into another bowl full of cold water until the egg is cool enough to handle. Unwrap and marvel at your ingenuity.

My Eggs

Sepia isn’t the only color option, though, there are many variations of natural pigments that can be used to imbue the eggs with sweet, tender, and genuine colors not found in a little tear-drop of McCormick food coloring. For yellow eggs, try stargazer lily stamens (use a non-reactive pot and watch your apron!), for purple-blue use beets, for green eggs (ham, foxes, and boxes not included) try spinach. Have some friends over, experiment, make a delicious “McFadden Ricotta Fritatta” with the egg you have left over, and have a happy spring.

Melissa's Upstate Eggs (left) Ann Marie's West Coast Eggs (right)
%d bloggers like this: